
The Journey Resumes

Over the weekend, I started building a 16” x 64” diorama. 

I’ve been pretty inactive in the hobby for about 15 years. Now that I’m nearing retirement I’m thinking about building another small-to-medium layout (4 x 8 island to as large as a 9 x 15 U-shape). At this point, I’m debating whether to stay with HO (I have a lifetime accumulation of HO equipment) or switch to On30 (I really like the heft and detail, and I’m a sucker for old-time narrow gauge trains). The diorama is meant as a warm-up for that.  

I wanted to get a feel for building track and one or two structures in O scale, and try out some new construction techniques, like foam construction and Sculptamold instead of plaster. I plan to hand lay the track, to see if my eyesight and patience as still up to it. The finished product will provide a place to display some of my On30 equipment and do a little photography. It will mostly live on a shelf in my garage/train room, but will be lightweight enough to move outdoors to take pictures. 

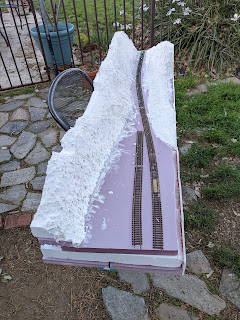
These pictures show the glued-up foam structure, a mix of pink extruded foam and beadboard, and what it looks like with a first coat of Sculptamold. Rock castings come next. There are also a couple of shots with a train to give a sense of scale. The track you see is some old HO flex pinned in place for location. Yes, in the past I have normally laid track before building scenery, but I got all excited gluing up foam and the next think I knew, there were mountains.


The shot above was taken with the module in its "home" on a shelf in my garage, pre-Sculptamold. After looking at this, I decided the gap between the hillside on the right, and the rock formation on the left, was too wide -- I wanted the feeling of a little train squeezing through a narrow cut. So I added some scrap foam "boulders" to build out the walls on both sides. I may have overdone it -- I will have to check carefully to be sure I maintain minimum clearances after adding rock castings over a layer of Sculptamold.


Here you can see those foam "boulders" in the cut. I also glued bits of scrap foam on the hillside to break up the profile of the ridgeline.


Overall view, pre-Sculptamold.


Here's the cut with a first layer of Sculptamold added. I'll add rock castings over this. I like to cast in place -- fill the mold, let it begin to set, then slap it onto the hillside and hold it there until it sets enough to stay in place. Doing it this way, the mold conforms to the shape of the hillside, and you can overlap molds so there isn't much need to fill gaps in between. I've never tried it with Sculptamold, but from my limited experience using the stuff, it seems like it should work well.


Similar view to the earlier one with the engine, this one with Sculptamold. By the time I add another quarter inch with rock castings on each side, it's going to be down real close to a 3-inch space.


Overall view with Sculptamold. The flat area at the bottom in this picture will be the site of a small mining operation. Originally, I was thinking of a small station, but a think a mine is more in keeping with the theme I'm going for here. I'm thinking I may just have an ore bin (Berkshire Valley has one that I have my eye or, or it would be easy enough to scratchbuild -- I have plans for a couple of different designs). Maybe a small supply shack or office building next to it. See the little notch in the ridgeline on the left? The mine car track will disappear through that notch, and the mine itself will be a flat or photo, just visible behind the ridge. I will likely shift the tracks just a bit father right (toward the front edge of the module).


The is the Berkshire Valley Ore Bin. If I was good with PhotoShop, I could probably cut and paste it into a photo of the module. Instead, I may build a cardboard mockup. Part of the learning experience here is how much bigger things are in O scale compared to HO -- I was originally thinking I could fit a full mine in the available space, but looking at it now, it seems like it would be tight. And again, I want to keep things uncrowded.

Added rock castings today (February 18) on about 2/3 of the area where they're needed. I used Sculptamold and I think they look okay -- we'll see when they're painted. I mostly do wet casting -- fill the molds, let them about half-set, then slap them on the hillside and hold them in place until they stick. It went pretty well. Photos below are not the greatest, but you can seen some rock detail in the outcropping at the right, front corner of the diorama.

Detail from the castings is visible here on the outcropping on the right, where the light hits it at an angle.


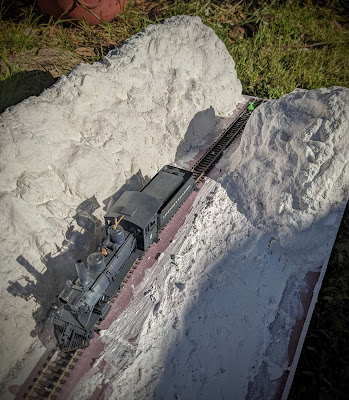
You can see more detail in the outcropping on the right, and some detail in the rocks on the left, in this shot. The slope to the right of the engine will be dirt and brush, so no rock castings there.


You can't see a lot of rock detail here, but it's a nice side-on shot of the loco.

Next up, painting. I like to start with a coat of gray/tan latex flat interior house paint, tinned about 50-50 with water, then thin washes of artist acrylics or craft paint in various earth tones to add variation, and finally a thin wash of black to bring out the detail. I don't think I have any tan paint on hand, so I need to make a trip to Home Depot for one of their little sample jars of an appropriate color. One of the most satisfying things in model railroading for me, and certainly the best for the price, is watching scenery come to life when you apply some color. Stay tuned.

Today (2/20/22) I painted the rocks. Some pinkish-tan interior flat paint that we had left over from painting a bedroom, diluted 50/50 with water and splashed on with a 1-1/2 inch brush, leaving some white areas here and there. Then the same mix with some brown paint added, again splashed on in an irregular fashion, covering the white areas and some of the pink. I hit that with a spray of water to blend. After it dried for a while, I went back and dry-brushed with cheap acrylic paint from the craft store in shades of brown. Finally, after that had dried, gave it an overall wash of dilute black, again spraying with water to wash it off the high points and into the crevices.

This is the cut where the engine is positioned in earlier shots. I especially like the boulders on the left.

Some layered sedimentary rock. Area on the left isn't done yet.

Another view of the rock cut.


Comments

Popular posts from this blog

Side-Tracked

The other day, as my wife and I were rearranging some furniture in the living room, she made the comment that it might be fun to put a small train display on a side table where she normally displays some potted plants. She had in mind my Lockwood & San Emigdio On30 diorama, which she's watched me work on the last several months -- but of course, the suggestion got me thinking in other directions. Since the purpose, at least in part, will be to entertain the grandkids when they come to visit, it makes sense to have a continuous lap. Since the tabletop is only about 25 by 54 inches, that limits me to a 10 or maybe 11 inch radius, a bit more if I overlap the tabletop a few inches. I'm thinking On30, so that's too tight for any of the equipment I currently own. There are some people doing wonderful work in On30 building mini- and micro-layouts with these kinds of curves and smaller, using the Bachmann 0-4-0 and 0-4-2 Porters, Davenport gas-mechanicals, and other small switc...

Another B&V Out There?

Doing some online research, I discovered a reference to another model Bakersfield & Ventura. This one was a track plan published in the Model Railroad Planning annual in 2016. I immediately ordered a copy, which I received yesterday. The other B&V was designed by Bryon Henderson, and built by Larry Kedes. The concept is similar to the John Armstrong San Joaquin & Southwestern track plan in his book, 20 Custom Designed Track Plans. It assumes a route from Ventura, following the real-life Ojai branch of the Southern Pacific, then continuing north along the route of Highway 33 -- different routing than what I am assuming based on my research. Because the owner wanted connections with the Union Pacific as well as AT&SF and SP, the concept also assumes that UP acquired an early, real-life shortline that ran from LA to Santa Monica, then also gained control of the Hueneme, Malibu and Port Los Angeles through Malibu to Oxnard. The track plan is focused on the coastal portion ...

Side-Tracked, Continued

I was cleaning my garage the other day and pulled out a 30x60 inch layout I started some years back in HOn30, but abandoned pretty quickly. The trains were just too small for me, and there wasn't a lot of equipment available -- there's no equivalent of Bachmann's relatively cheap and plentiful ready-to-run On30 cars and locomotives, and only a few kits. I'm kind of taking this as a sign from the fates. The overall size of the old, partly built layout is in the upper range of what I was thinking about doing in On30. The curve of N scale track at the left end in the photo is 12 inch radius, and the right end is 13 inches, both in the range of what I was considering. The rest of the track plan doesn't translate so well -- the plan drawn on the board has a passing siding on the front side that would have been short in HOn30 and would have been all but useless in On30. The upper level branchline track has a 9 inch curve, which is probably too tight for anything but an 0-...